
Communication
The Importance of Communication
- Communication is the sharing of experiences, events, ideas and feelings through verbal (sounds, words, sentences) and non verbal (body movement, tone of voice, touch) channels
- Communication permits us to interact as human beings. It serves a number of functions including controlling, sharing of feelings, informing, understanding, imagining and sustaining social relationships
- In the medical setting, communication is an important skill required in order for the patient to give informed consent about their treatment
- Patients requiring a tracheostomy are acutely ill and disabled. The effects of the drug treatments along with the acute nature of their medical condition may render them unable to breath for themselves and require an ICU admission, they may have a degree of physical weakness. Although this is a temporary situation and many patients may make a good recovery, the psychological effects can be long lasting. One of the most difficult things for a patient to cope with, is the inability to communicate. Communication difficulties are also associated with increased length of stay on ICU due to patient’s inability to participate in goal setting, treatment and end of life decisions.
- Where appropriate, the patient/relatives should be informed, before the tracheostomy procedure, that they might be unable to create a voice while the tracheostomy tube is in place, as air is no longer passing through the vocal cords (a patient information sheet is recommended). They should be reassured that it is expected that the voice will return once the tube is removed or manipulated (except when a laryngectomy has been performed) and the nursing, medical staff and relatives will provide the patient with alternative means of communication until then.
- Communication serves to meet many patient needs including “social interaction, information giving, reassurance, discussion of feelings, advice and counselling” 1
- “The purpose of communication for critically ill patients is to help them maintain their identity as well as psychological, structural, personal and social integrity” 1
- The psychological status of the patient must be considered as they may be unable to speak and will often be anxious in the hospital environment.
- The role and responsibility of the Speech and Language Therapist is as a communication specialist is to facilitate communication and to ensure equitable communication and person time for all patients. Initial assessment of the tracheostomised patient usually occurs within the critical care setting, so the patients medical status needs to be taken into consideration and assessment needs to be functional and adaptable to the patient’s needs.
Non verbal communication – Methods to consider
Lip reading
Ask the patient to exaggerate their lip movements. Encourage use of short but complete sentences in order to make the message clearer. Look for key words to aid your understanding. This will require adequate oro-motor ability.
Facial expression and gestures
Concentrate on facial and body expressions which will add extra information to the patient’s “mouthed” words.
Coded Eye Blink or Hand Gesture
Instruct the patient to blink once for “yes” and twice for “no” in response to your questions. Alternatively consider thumbs up for “yes” and down for “no”, or any clear hand movement that the patient can achieve.
Alphabet Board, Picture Board and Phrase Books
Laminate A4 sheets displaying the alphabet in large letters, or simple pictures depicting basic activities/needs (e.g. drink, toilet…). These systems can be supplemented by a list or book of useful phrases for the patient (e.g. “Please call my husband”). Communication boards can be individualised for each patient by the Speech & Language Therapist.2
Electronic Larynx and Electronic Communication Aids
It is necessary for the Speech & Language Therapist to assess the patient for use of one of these aids, and then, if appropriate, advise the patient, family, carers and staff on its use. Use of these aids requires the patient to develop an adequate level of skill, therefore may not be suitable for short term use.
Verbal communication – Methods to consider
Manipulation of the Tracheostomy Tube for Communication
Voice production may be achieved in patients with a tracheostomy tube by using one or more of the following:
Cuff Deflation
Deflation of the cuff of the tracheostomy tube will allow air to pass into the upper airway on expiration. Phonation will be achieved as air is directed into the larynx, however the strength of the voice may be weaker as some air will pass out of the open tracheostomy.
Fenestrated Tracheostomy Tube
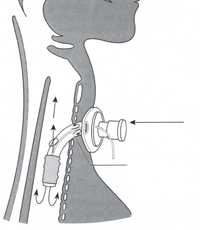
Use of a fenestrated tracheostomy tube also allows air to pass into the upper airway on expiration, thus producing voice. It is essential to remove a non fenestrated inner cannula if in-situ. The fenestration needs to be patent, as in some occasions the fenestration is in contact with the tracheal wall, thereby not allowing airflow through the fenestration. Re-adjustment of the patient’s head/ shoulders can be attempted to unblock the fenestration
Downsizing of Tracheostomy Tube
Use of a smaller tracheostomy tube will allow increased passage of air between the tube and the tracheal walls on exhalation but it will also increase the work of breathing as the resistance to air flow is increased. This will therefore need to discussed with the MDT.
Intermittent Finger Occlusion
Intermittently occluding the tracheostomy tube with a gloved finger will allow for effective voicing in many patients. To use this technique the patient should ideally be able to tolerate cuff deflation, but if not must have a fenestrated tracheostomy tube (with fenestrated inner cannula) in place.
One Way Speaking Valve
One-way speaking valves can be used very effectively with tracheostomised and ventilator dependent patients. Use of a one way speaking valve is dependent upon the patient’s ability to tolerate cuff deflation3.

Portex® Orator one-way speaking valve
This type of speaking valve has a one-way mechanism where the valve opens on inspiration, allowing air to enter the airway via the tracheostomy, however closes on expiration, forcing air into the upper airway and larynx to allow for phonation.

“Passy Muir” tracheostomy and ventilator speaking valves
For the patient who is ventilator dependent and can tolerate cuff deflation, the “Passy-Muir” valve should be considered.3
Talking tracheostomy tube
Patients unable to tolerate cuff deflation, (eg. ventilated patient), should be considered for use of a vocalaid tracheostomy tube. Air from an external source is delivered above the cuff to allow airflow through the larynx for phonation. This may allow the tracheostomised patient to communicate verbally, however as the airflow is reduced, voice may be weak.
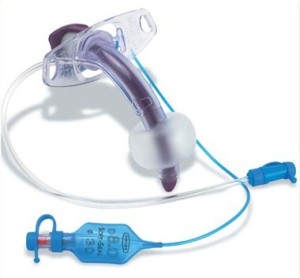
Portex® Vocaloid / Suctionaid Blue Line Ultra® tracheostomy tube
The Speech & Language Therapist will be able to provide information and advice on achieving the most appropriate communication system for the individual patient.
Box 8.1 Procedure for using a One Way Speaking Valve – Self ventilating patient
Remove the speaking valve if:
- Respiratory difficulty occurs
- SpO2 levels decrease
- The patient becomes fatigued
- The patient requests it

Incorrect
Speaking valve used in the presence of an inflated cuff preventing exhalation
Correct
Speaking valve with cuff deflated
Box 8.2 Procedure for using a Passy Muir Speaking Valve (PMV) inline with ventilator
Slowly deflate cuff while carrying out synchronous suction. Check for airflow at mouth
Know your ventilator
It is best to use the NIV mode on your ventilator while using the passy muir valve
- Increased coughing
- Increased respiratory rate
- Respiratory effort
- Need for suction increases
- SpO2 levels decrease
If signs of intolerance are observed, please remove valve, re-inflate cuff and do not proceed any further without further reassessment
- Respiratory rate / effort increases
- Heart rate rises
- SpO2 levels decrease
- Patient experiences distress / discomfort
- No supraglottic airflow
- Weak / breathy / hoarse voice
- Inspiratory / expiratory stridor
- The patient requests it
- Respiratory difficulty occurs
- SpO2 levels decrease
- The patient becomes fatigued
- The patient requests it
Contradictions for speaking valve use
- Inability to tolerate full cuff deflation
- Airway obstruction
- Unstable medical/pulmonary status
- Laryngectomy
- Severe anxiety/cognitive dysfunction
- Anarthria
- Severe tracheal/laryngeal stenosis
- End stage pulmonary disease
If communication is particularly difficult or further advice is needed, please contact the Speech & Language Therapy department.
References
- Ashworth P, Kegan C (Eds) (1985) Interpersonal Skills in Nursing Research and Applications Croom Helm London
- Boardmaker for Windows. (2001) Mayer-Johnson U.S.A.
- Dikeman KJ, Kazandjian MS (1995) Communication and Swallowing Management of Tracheostomy and Ventilator-Dependent Adults San Diego Singular Publishing Group, Inc
- Prentice W, Baydur A. (1989) Passy Muir Tracheostomy Speaking Valve on Ventilator-
- Mason M, Watkins C. (1992) Protocol for Use of the Passy-Muir Tracheostomy Speaking Valves The European Respiratory Journal Aug 29-Sept 3